In this series, I will lay out the basic structure of my approach to photographing horses. I didn’t really even know I was putting most of these concepts to use for the first many years I was photographing; they were, at most, subconscious for me. I just knew when an image was “there,” and that usually translated into hitting the shutter at the right time. Good enough. Except… then people started asking me how to photograph horses. I’m a professional (dammit), so I should be able to say what I’m doing. But I couldn’t. I’d open my mouth, and “I don’t know” was the only thing that came out, even though I felt that something really was happening while I was photographing. There had to be some set of parameters—a “short way”—to know what was happening. Here’s what I’ve learned so far.
PART ONE: The Science Behind the Silhouette
What Makes A Successful Image?
Successful images have some quality of “rightness” to them. For me, as a predominantly kinesthetic being, it has a physical feeling of “settling” or “resting.” It’s always something that just sits there neatly in the image and embodies the most ideal aspect of whatever the subject of the image is. The trick is to know what has to happen for an image to look like what you want it to, and then become aware of what’s happening in front of you so you can adjust accordingly.
Two books were instrumental in helping me understand more about what happens in the body when seeing the world: Images and Understanding: Thoughts about Images: Ideas about Understanding and Sparks of Genius: The Thirteen Thinking Tools of the World’s Most Creative People. From them I’ve (mostly) learned how I translate what I’m seeing and feeling into words rather than wild gesticulations.
How the Eye Receives Information
In the eye (human and generally otherwise), there are specific cells dedicated to perceiving each of the physical directions (up, down, left-to-right, right-to-left, away, toward, etc.), light and dark, and colors. The brain instinctively recognizes forms by distinguishing the light and dark areas of an image as well as blocks of color, and organizes the scene from bits of information into a recognizable whole.
The brain uses the eye to search the world for things it wants to see, like other humans. Specifically, faces. It starts first with mother, then other family members, friends, and enemies or predators and continues with input from other sources that navigate the rest of the body through the world. This is why people see Jesus in a tortilla—humans long for other human faces, and subconsciously look for them wherever they put their eyes. The instinctive brain is willing to form a relationship, or at least make a correlation, with anything that relays a face to it through the eye—in the case of the above, one of the most recognizable. Even in a tortilla. I don’t happen to have an illustration of a holy tortilla, but you get the idea.
The magical part of this is that the receptors in the brain can be trained to organize and interpret any pattern or shape.
Depending on what the eye is most often used for (what you look at most) and, to a lesser extent, what kind of emotional connection you have to it, you can learn to interpret instantly what you are looking at.
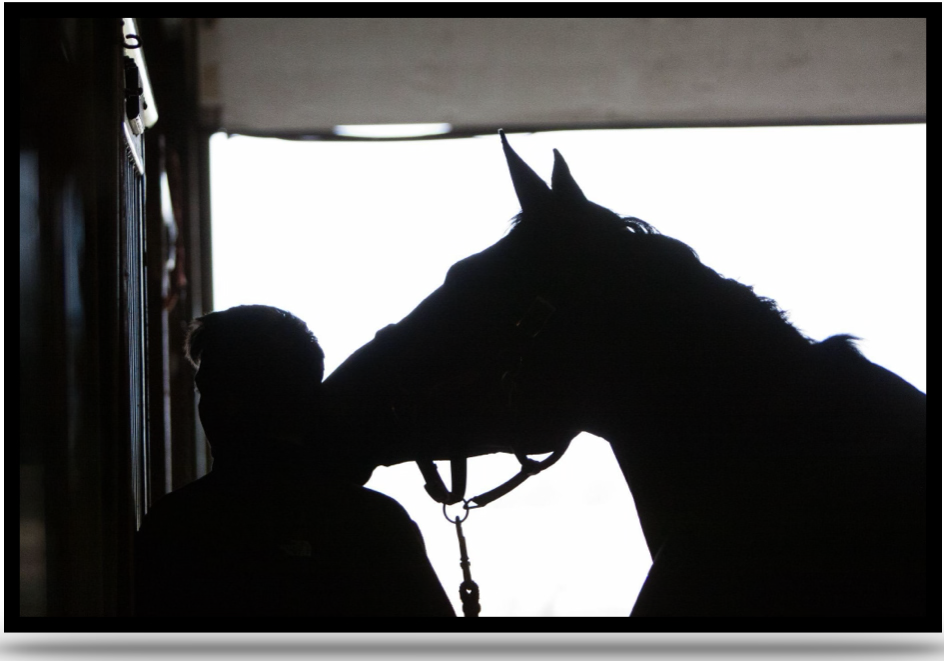
We can’t see many details in this scene, but the shapes in it are something any horse person can relate to. The image illustrates an ideal moment you may have had in the barn: whiskers, and soft, warm horse breath on your cheek, the smell of horse and barn, and quiet communion. Your eye makes a circular movement from horse to person and back again to horse, simply because of the shapes and lines in the image and the simplicity of the background.
How This Applies to Images of Horses
When we have looked at horses for so long, our brain begins to assemble the horse’s pattern of movement with ease, and can identify when a horse is in an ideal shape, or silhouette. Ideal is recognizable in an instant. Have you ever worn a horse logo that was a silhouette of some sort? There’s a reason you identify with it: the shape is your expression of the ideal horse for you. An ideal equine silhouette tells us that the horse is/will be ideal for our needs, which can range from the very physical world of under saddle or in-harness work to the more experiential world of visual and emotional pleasure.
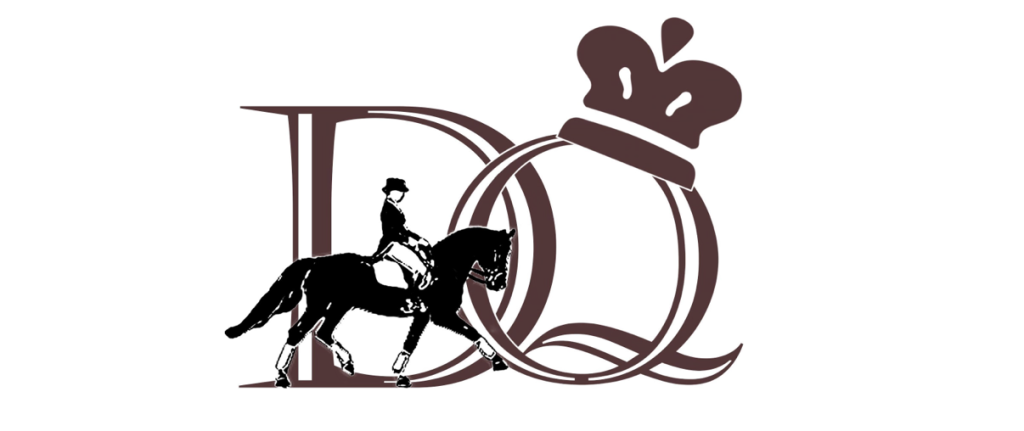
A t-shirt logo I designed just for fun. The silhouette unquestionably says “dressage”. The “DQ” doesn’t hurt, either.
Practically Speaking
I heard a dressage clinician once remark that a pair “presented a nice silhouette” when a student and horse were doing well—when he recognized their shape to be what he thought it should be. He held in his head an image of what ideal looked like, and could match the shapes up when the horse and rider in front of him fit together neatly. So, know what you’re looking at, and know what it should look like. Then, lay one over the other and take the picture when they look the same. It’s as simple as that!
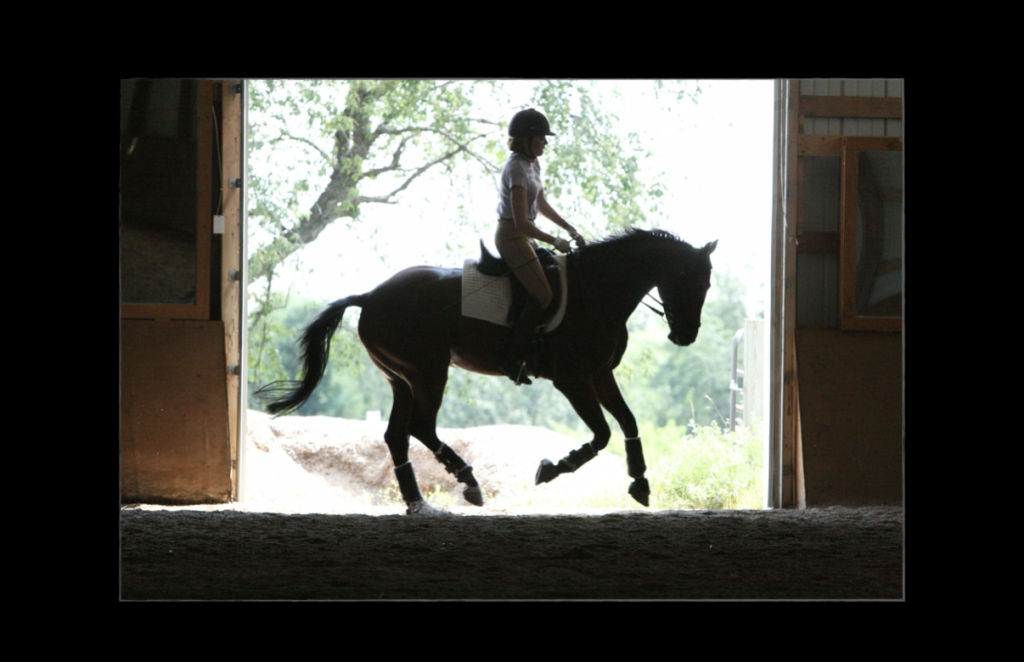
The visual cues of tack, rider position and clothing, and gait lead to a very clear impression of “dressage” even with the limited information in this silhouette image. The bright background contrasts strongly with and enhances the dark shape of the horse and rider, and the trees in the background support that shape by framing them in a round, uphill sort of way.
This is important both in the creation of imagery and the consumption of it. The creator of the image needs to send a message about the horse in the image, i.e. “this is my horse, and I love him,” or “this is your next dressage horse,” or possibly even “does this thing blow your mind, or what?” The consumer, in turn, is looking to understand these messages, and make a decision regarding whether and how to follow up with an action, even if that’s simply to keep looking at the image (the action could be to buy the horse you’re trying to sell). A long engagement is the goal behind any image, and taking into consideration the visceral “rightness” of an image is one of the steps to creating a successful image.
Keeping in mind that the final result is a two-dimensional image, several things can affect the silhouette of a horse:
What shape is the horse making, and how does it fit into the frame (should the frame be horizontal or vertical)?
What shape should the horse be making (what shape shows this particular horse best based on conformation, age, fitness level, breed, or type of movement)?
How are the light and the background affecting the shape of the horse? Do they help or hinder?
There are so many details to consider in the points above and it would take at least a year’s worth of articles to cover it all, but I’ll talk a bit more about each of them in the following articles where I’ll discuss the basics of conformation, head, and movement studies.
A SHORT WORD ABOUT EQUIPMENT
I’m not going to go into cameras and lenses and settings very much in this series, even though they are a huge part of the photographic process. That’s what camera manuals, Google, and good old-fashioned practice are for.
However, I’m often asked how to take a really good picture using a cell phone. This is about as possible as getting your kid’s 30-year-old pony to the Olympics. Maybe it could happen, but really, probably not. If you want to get good images, you have to have reasonably decent equipment. It doesn’t have to be great. I definitely don’t have the most updated equipment, but I do have stuff that’s good enough to get the job done well. Lenses are particularly important, and cell phones just don’t have the quality and telephoto (zoom) properties of a camera with an interchangeable lens option. The other issue is shutter lag (when you press the shutter button and nothing happens until next Thursday and you’ve missed the shot and several days of your life). This is not really an issue with professional cameras, or even good quality consumer cameras. That’s about all you’ll hear me say about equipment. It’s not really my thing.
That said, get your camera (or iPhone or whatever you have) and see if you can frame up a silhouette of your horse. Then, tell me about your experience, and ask me some questions!
In part two of this series, I’ll describe a sort of step-wise process I loosely go through when I’m photographing a “representative” image of a horse, such as a stallion at stud or horse for sale.
(PART II BELOW)
This article series originally appeared in The eQuester, the newsletter of the WDEA, Wisconsin Dressage and Eventing Association (formerly WDCTA, Wisconsin Dressage and Combined Training Association). Special thanks to all the owners, riders, handlers, and of course the horses for making this possible and allowing me to use your images.
PHOTOGRAPHING HORSES “The ShortHorse Way” PART II: THE PROCESS, CONFORMATION, & HEADSHOTS
FIRST: FIND APPROPRIATE LIGHT & BACKGROUND
I talked a little bit about this in the previous article, and I’ll expand on it just a little bit here.
The pattern of light and shadow, created by the quality and direction of light falling on the horse, either helps or hinders what we want to show. Basically, we need to figure out where the most appropriate light is coming from and where it’s going, and what kind of light it is, so we know where to put the horse.
Remember that our eyes are going to look for areas of contrast. If we have a dark horse, and we photograph him at noon when the light is coming directly from overhead, the first thing we’re going to see is the bright light on the topline and the top part of his ribs. This makes the horse appear as if he has a swayback as we see the line created by the intersection of the light area and the shadow area, which is always curved to follow the contour of the belly. It also creates shadows over the eyes or even the whole face, so you can’t get a good idea of the horse’s expression or facial features. This is one of my biggest pet peeves as it’s so easy to fix by moving the horse out of the sun or waiting for better light.
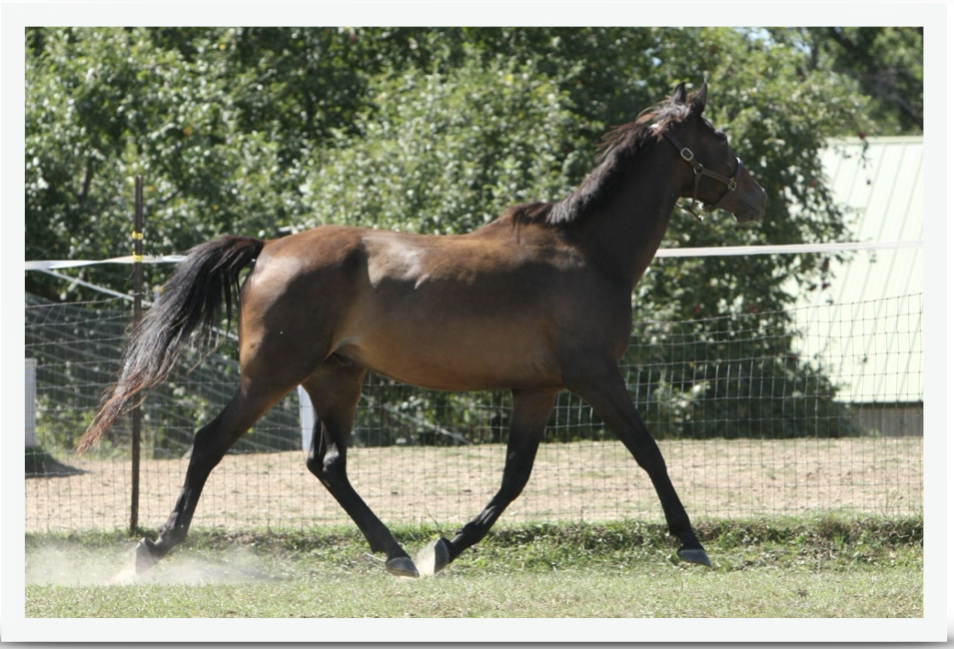
This image was taken at about 2:00 in the afternoon in August. The sun is slightly behind me and to the left, but is mostly coming straight down onto the horse’s back. In my opinion, this is the worst light for a representational image. The first thing we see is the point of the hip. The haunches, as well as the barrel, are divided by the sharp contrast between light and shadow, which draws attention to the area with the least useful information. In addition, the whole front end is in shadow, leaving their expression and personality of this horse in mystery. The background here is reasonable, although looking at it now, I would prefer to have blurred it more by opening my f-stop wider. This lets more light in faster, so anything closer to the camera (the horse) will be sharp, while things that are further away and from which it takes longer for light to reach (the background) are not recorded with as much detail, so they’re blurred.
For the purposes of a representative image, it’s generally best to have the light hitting the horse and the background from behind and slightly above the angle of the camera, or at least close enough that there are no distracting shadows in places we don’t want them. We should pick a time of day when the angle of the sun is lower in the sky. The old rule of thumb is that you should be able to see your shadow in front of you, so you know the light is coming from behind you. This is fine, but do make sure your shadow isn’t hitting the horse, too.
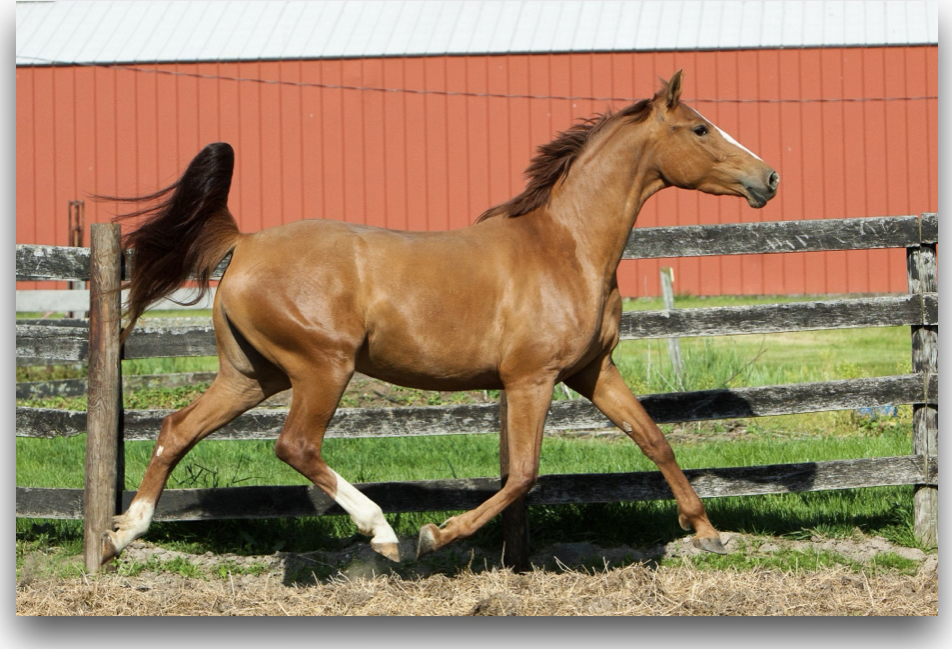
This is a much more appropriate light. We can see all aspects of this horse clearly, including her expression and some of her personality. This was taken at 8:45 in the morning in mid-May. The sun is still behind me and to my left, but it’s at a much lower angle so it shines on the whole horse more evenly with fewer shadowed interruptions. The background here is better than the first image; the light is hitting it rather flatly so there are fewer distracting details. If I were going to use this image in a publication or an ad, I would remove the wire and other small elements, and bring the red part of the barn all the way to the top of the frame to simplify it further.
The way the background looks is controlled, again, partially by the contrast between light and shadow. A simple background will create the best silhouette of the horse, which takes advantage of our brains’ tendency to see shapes before detail. You can simplify a background by throwing it out of focus, adding or subtracting light to it, or picking a spot that has very even lighting on the background. A complicated background, one that has lots of patches of light and dark or lots of different colors or anything else that’s not a plain color—like the sky, or a treeline in the distance—can help tell a story or frame the horse but has to be used carefully so it’s not a distraction.
The brighter the light hitting the horse and background, the deeper the shadows will be. If you have a lighter horse in full, direct sunlight, and you put him in front of a dark background—maybe it’s a pine forest—the forest will show up dark or possibly black if the horse is exposed properly (this can be really cool). If the background is exposed properly, your light horse will be a huge glowing blob in the image.
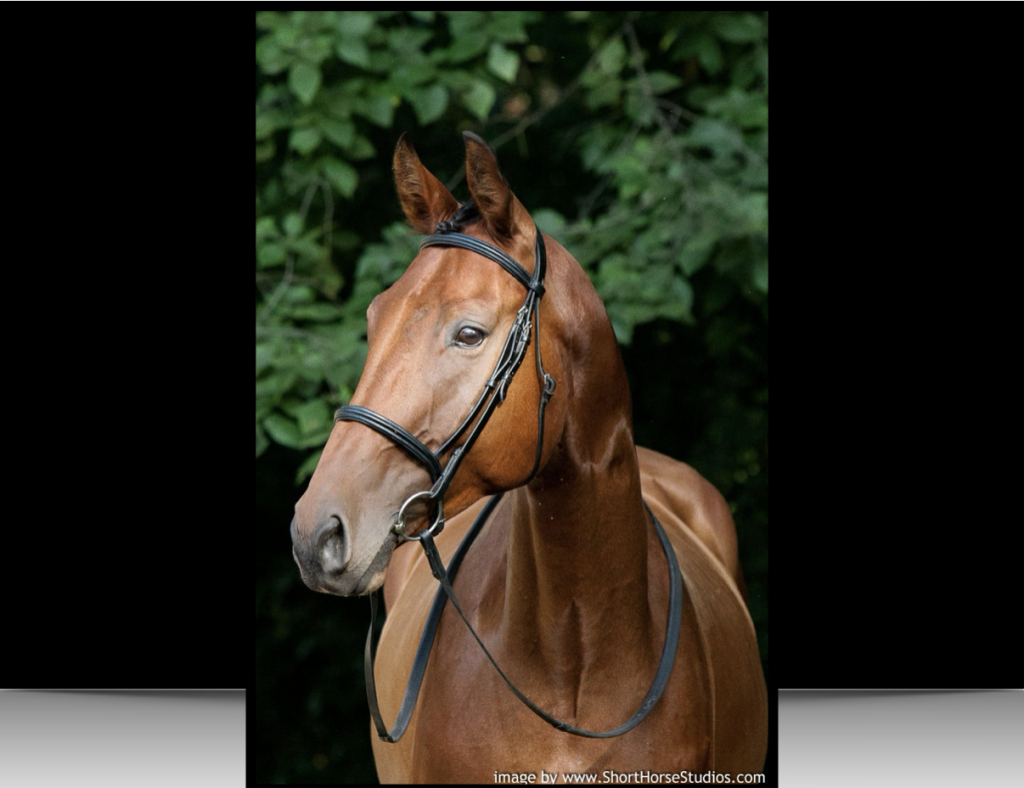
This image was taken on a sunny day. The horse was placed in an area that had a woods behind it, was underneath some trees to block overhead light, and had some open sky in front as the main source of light. I was lucky enough that things lined up right so I could get a patch of light shining through the trees in the right spot to highlight the horse’s face. Because the patch was so bright and that was what I was exposing for, everything in the background was underexposed. Even though the horse wasn’t white, there was enough of a difference between light and dark to make a dramatic contrast between the horse and background.
SECOND: DECIDE…CONFORMATION, HEAD, or MOVEMENT
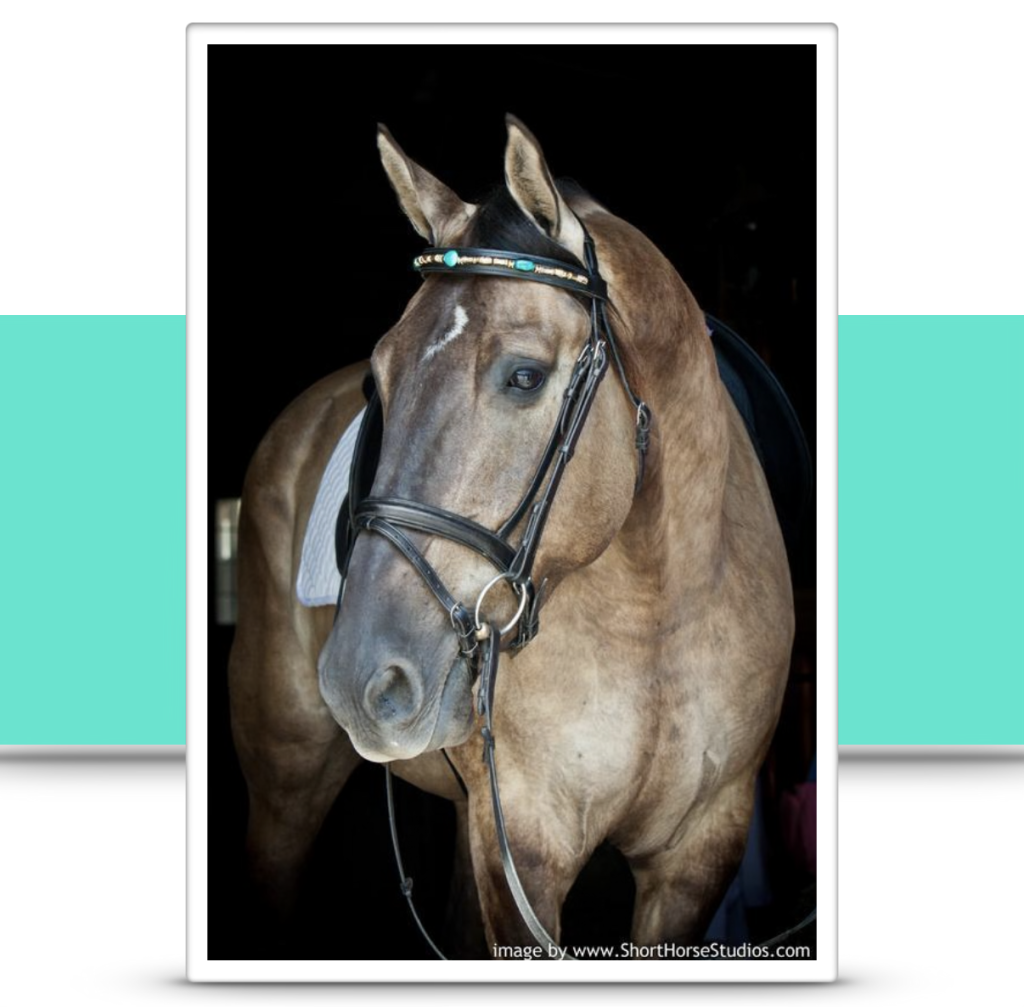
This image was taken just inside the aisle of a barn on a sunny day. Tons of light is reflecting off the ground outside, creating soft, even light inside on the horse. The focal length is 70 mm, which is the widest I would typically use for a head shot. However, this shot was intended to display the browband of the bridle, so a wider focal length was needed to see it more closely.
We need to know how far away we need to be to get either a conformation or headshot or movement. We also need to know what lens to choose based on what we’re trying to do. Lens choice and lens focal length are especially important with horse photography. A wide angle lens (8-35mm) will always make a horse look distorted, especially with a head shot, and especially if you stand right up next to a horse (think fun house mirror). I almost always use a telephoto lens (70mm and up) and stand back further when shooting horses. Occasionally I do use a wide angle lens, but only for a specific effect.
CONFORMATION
The basic idea of the conformation shot is to show that the horse is balanced and suitable for the task at hand. We need to look at a horse from the side the way a judge does, and the horse needs to be set up as if he were being presented to a judge at a show.
The horse has to stand up “with a leg in each corner” so we can see how he’s put together, how he balances himself over his feet, and get an overall impression of who he is. Generally, the horse is facing to the left, the left foreleg and right hind leg should be perpendicular to the ground, and the right foreleg and left hind leg should be set slightly back and forward respectively, so that when you look from the side the separation between the legs starts to happen at the knees and hocks.
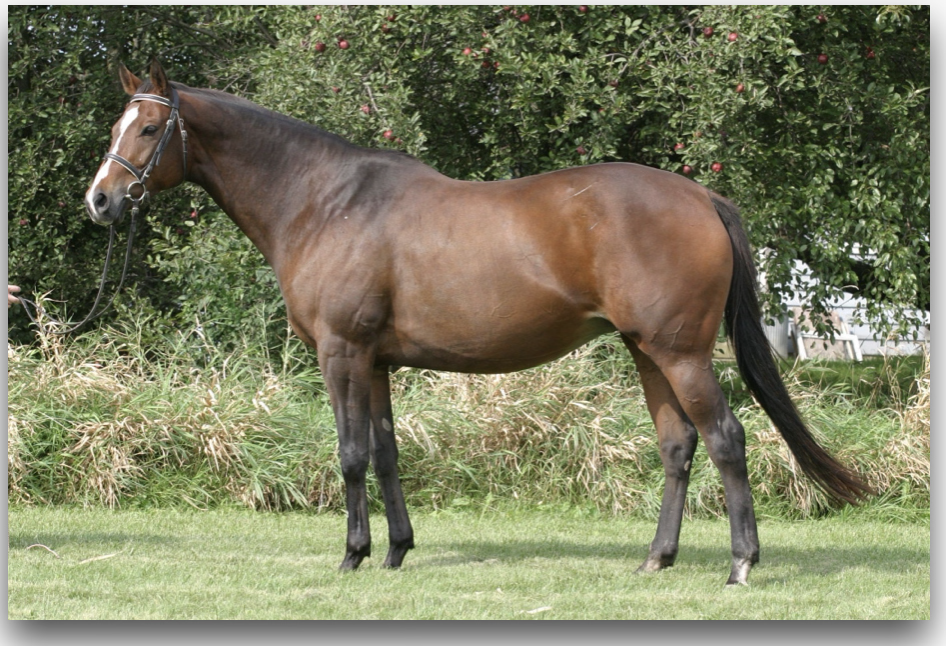
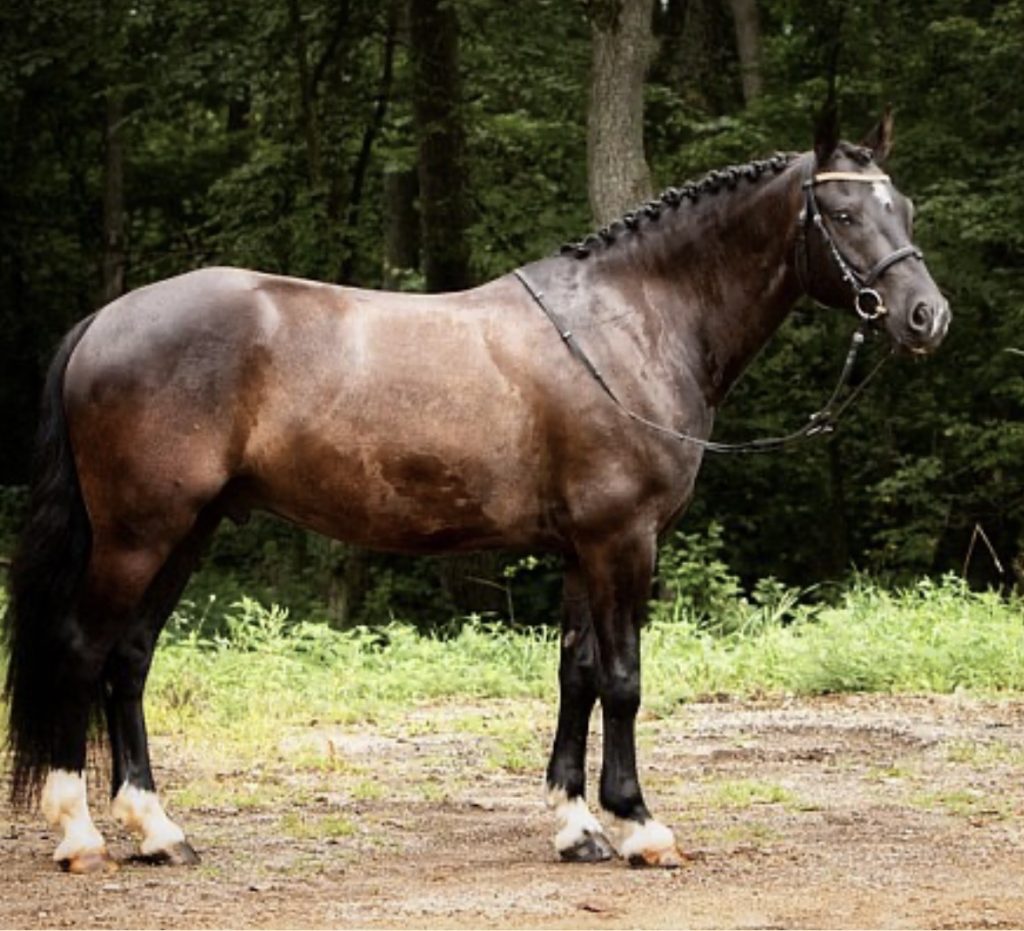
This mare is well balanced over her legs, with her head slightly turned so we can see her lovely expression. Her neck is at a natural lever for her and she looks alert but relaxed. The light is coming from behind and to my left. It’s hitting the horse evenly enough to see her features clearly, and isn’t so bright that it creates too much distracting contrast. The background is fairly amorphous, although looking at it now I would like to have moved the horse further from the background to let it blur more so the silhouette of the mare would stand out a bit more. Shortly after this image was taken, a storm rolled in and we were rained out, but before that, the clouds knocked down the sunlight enough to give us this great soft light that is my favorite for portraiture.
Every horse is different, and will need a slightly different variation on the “standard pose.”
What is the horse’s shape—is he square, or rectangle?
How far apart do his legs need to be in order for him to look like he covers ground without looking sprawled and unbalanced?
When we find the position the horse looks most “harmonious” that’s where we start to photograph him.
The appearance of the neck seems to be a strong indicator of how functional a horse appears to be. I like to keep the neck at whatever level the horse is most comfortable with, as that’s probably what is going to look best. This is with the caveat that the horse actually is comfortable. If he’s tense, with his head high and neck tight, it’s probably not going to look good. The only way to fix that is to make the horse comfortable.
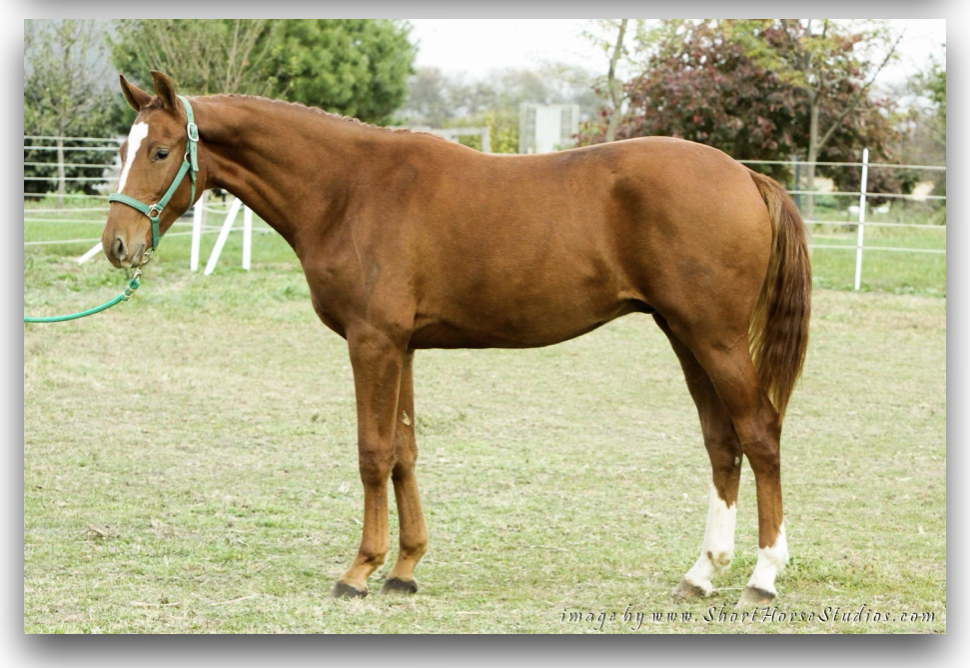
I chose a more level angle for this two-year-old gelding because he has a nice topline and a good proportion between his body and his legs. I would have liked to open his stance just a bit, however. I feel like he looks a little tight in his body here and would look more balanced and relaxed if his feet were a little further apart. I do like the level of his neck and the slight arch along the length of it.
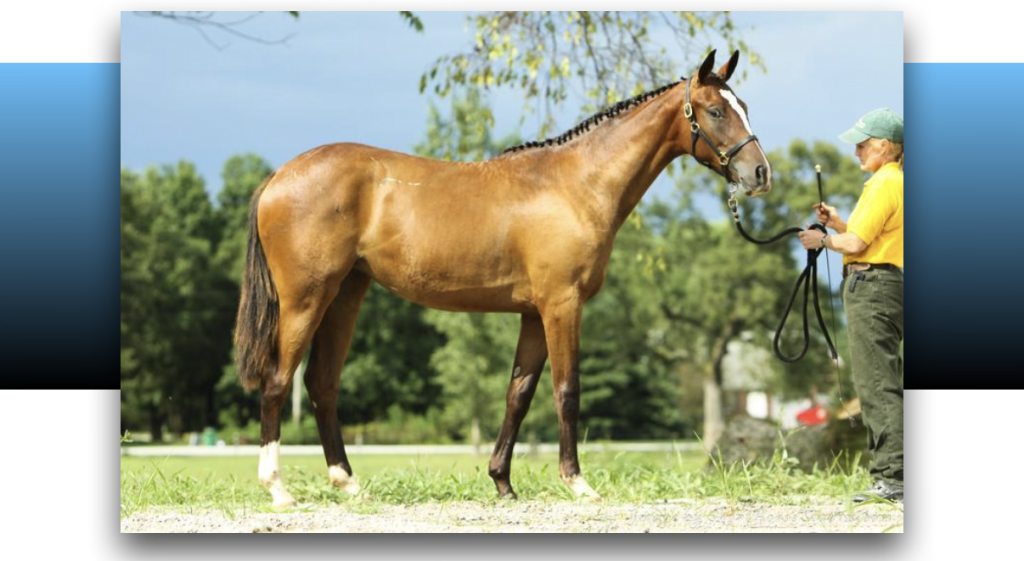
A lower angle on this yearling filly emphasizes her long legs while de-emphasizing her immature topline. Her stance is a little wider than what would be traditional, but it works for her because she’s a little croup-high in the moment, so it helps to lower her croup and provide a wider visual “base” for her front end. I would have liked to have a little more arch at the base of her neck and a looser under-neck, though. I think having such a defined line from her poll to her forearm makes her appear heavier on her forehand.
We also have to take into consideration the overall shape of the horse and how the neck completes the image. If it’s really straight and comes straight up out of the withers, but the underside is not overdeveloped (ewe neck), a higher neck position can complete the silhouette well and not leave a “gap” in front of the withers at the rise of the crest of the neck. A horse with a nice neck that comes out of good “saddle withers” is going to be able to do just about anything with it and look good. Almost every horse looks good with a little arch in the neck if you can make it happen. If you can get the horse to turn his head just a little bit to you so you can see a little bit of his forehead, you can often thin a thicker throatlatch, add a little arch to the poll, and the horse often has a more pleasant expression.
THE HEAD
A head shot tells us about the internal character of the horse. How interested is he in his environment? Does he seem happy, or worried, or bored? What is the energy he’s projecting, and is that how he usually is (will you get an “honest” portrait of him)?
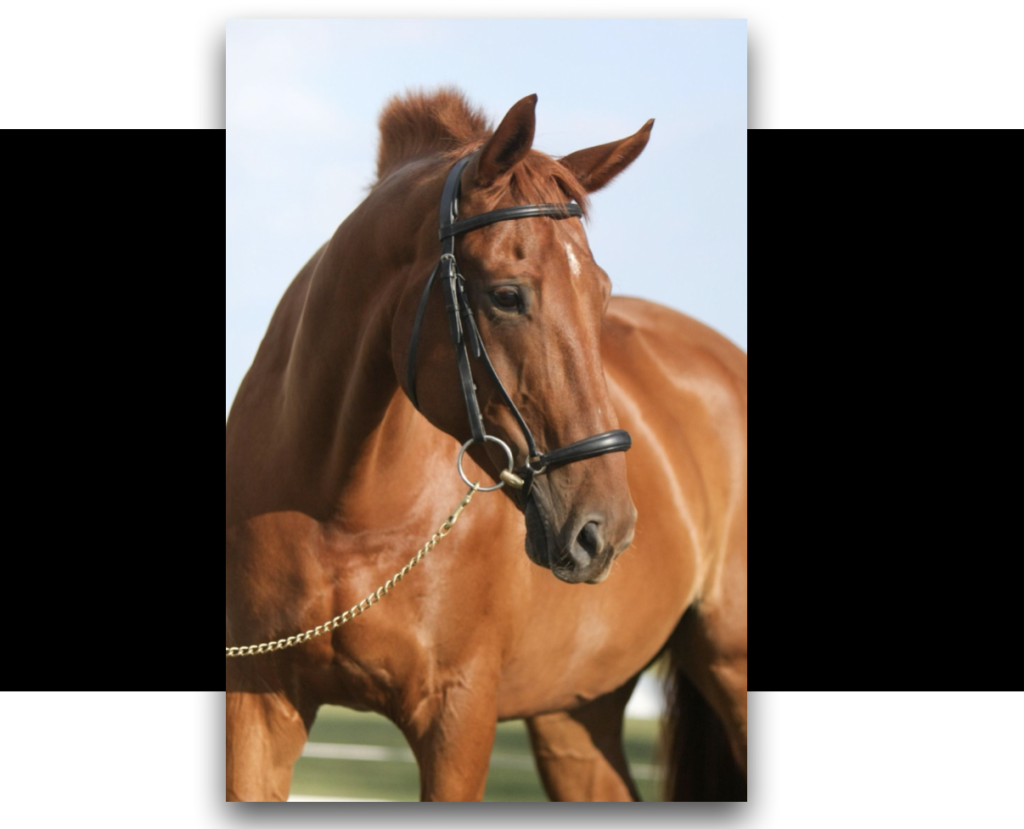
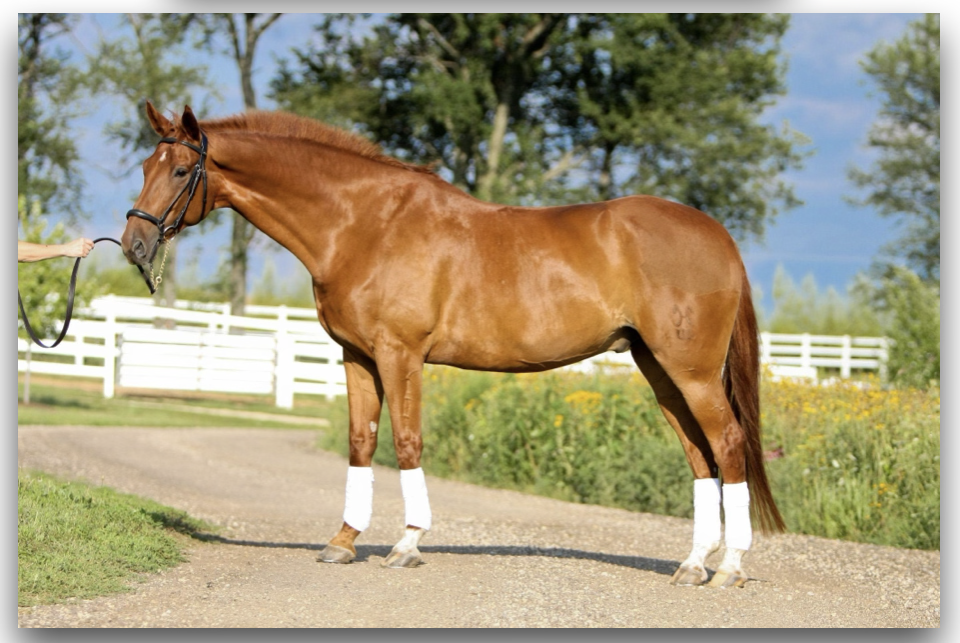
Rather than light straight on to his face, I turned his body and his head so the light would fall across his face, showing more dimension, detail, and personality. This gelding also has quite a long neck (see conformation image), which can be used well by this 3/4 angle along with turning the head and neck. He has a sweet expression, and his longer face is balanced by the angle of his head so that we see more of the far side of his head, making it appear wider, and more proportional. I’m at a slightly low angle looking up to get a good view of his eye, and I have a very shallow depth of field to emphasize his face.
Consider the conformation of the horse’s head and the shape it makes in your frame.
Is the face broad or narrow?
Long or short?
Where are the eyes set?
How is the head set on at the poll, and how much room is in the throatlatch?
I try to shoot right into the center of the horse’s eye, and base the angle of the head on where the eye looks best. A 3/4 angle shows more of the horse’s face and is generally more pleasing. The ears should of course be forward, unless there is a creative reason not to do so. Try to keep at least a little triangular space between the jaw and the start of the underside of the neck. Hiding it can make the poll and throatlatch look thick and constricted. While very few horses look good in a straight-on (from the front) head shot, sometimes you can avoid the neck and throatlatch issue all together by shooting the horse from the front and hiding most of the neck. This works best with horses whose eyes are large, expressive, and set forward on the face.
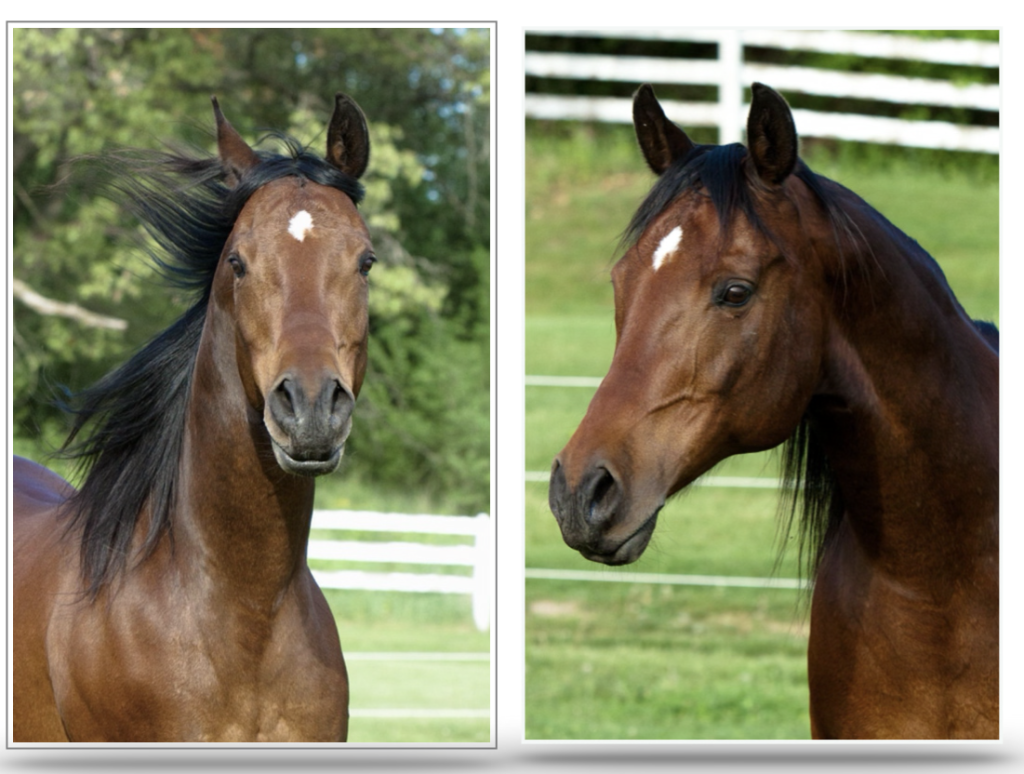
Most horses don’t look as good directly from the front as they do from another angle. The horse on left: there is no definition between the head and the neck, and it becomes one mass without much shape. The neck also looks thick and short. On the horse on the right: we get a much better view of his eye, and his neck and head are no longer one unit.
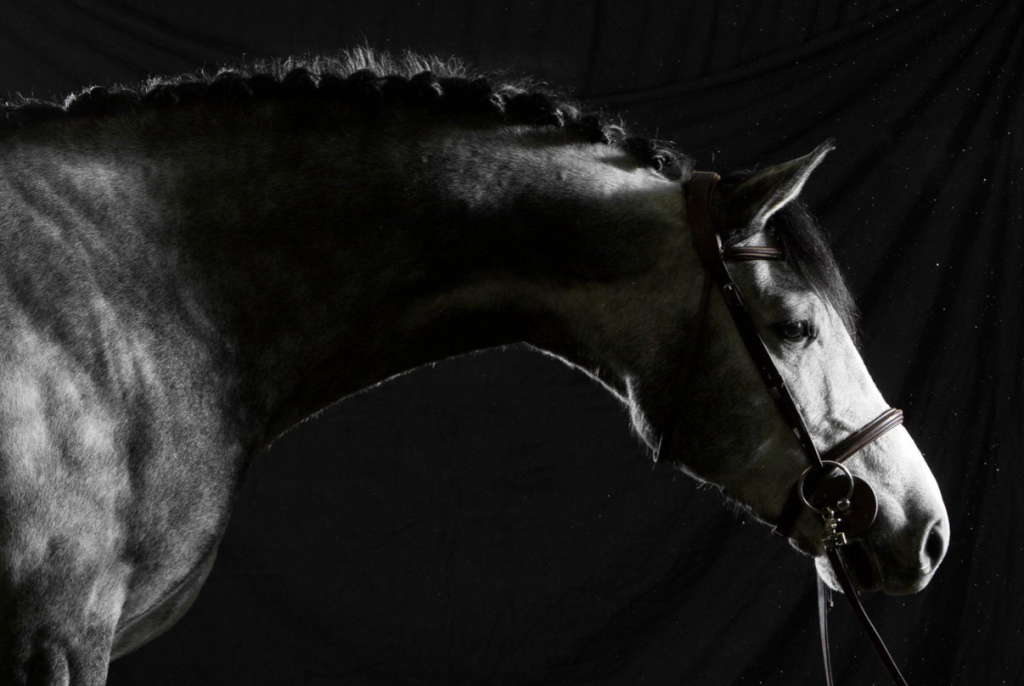
Shot from the side, this young stallion’s somewhat shorter neck works well for this type of image. There’s a nice, long arch to his neck, his throatlatch is clear, and he has a sweet, relaxed expression. I set up studio lights specifically to enhance the contours of his face and shoulder muscles.
MOVEMENT
For a movement shot, we need to plan for the direction of movement with the same ideas we have about lighting and background. I will talk more about photographing movement in the next article, since there’s enough detail that goes into a movement shot to warrant an article in itself.
THIRD: CHOOSE A CAMERA ANGLE
Next we need to pick one of four basic angles (determined by the angle of the horse’s body relative to you):
- front
- 3/4 front
- side
- 3/4 rear.
A frontal or 3/4 view generally fits into a vertical frame, while a side view (for conformation, movement, or a head shot with the neck included) generally fits well into a horizontal frame.
A shot from the front really doesn’t show much of the horse’s conformation, but can work for a head shot and sometimes even for movement. Gawky youngsters who might be a little “butt-high” tend to photograph better from the front or rear, but older horses or those with especially balanced conformation and movement look good from the side, which of course is the traditional view for a conformation shot. Chubby horses might also generally look good from a frontal or 3/4 angle to minimize the belly line (this can work for people, too!).
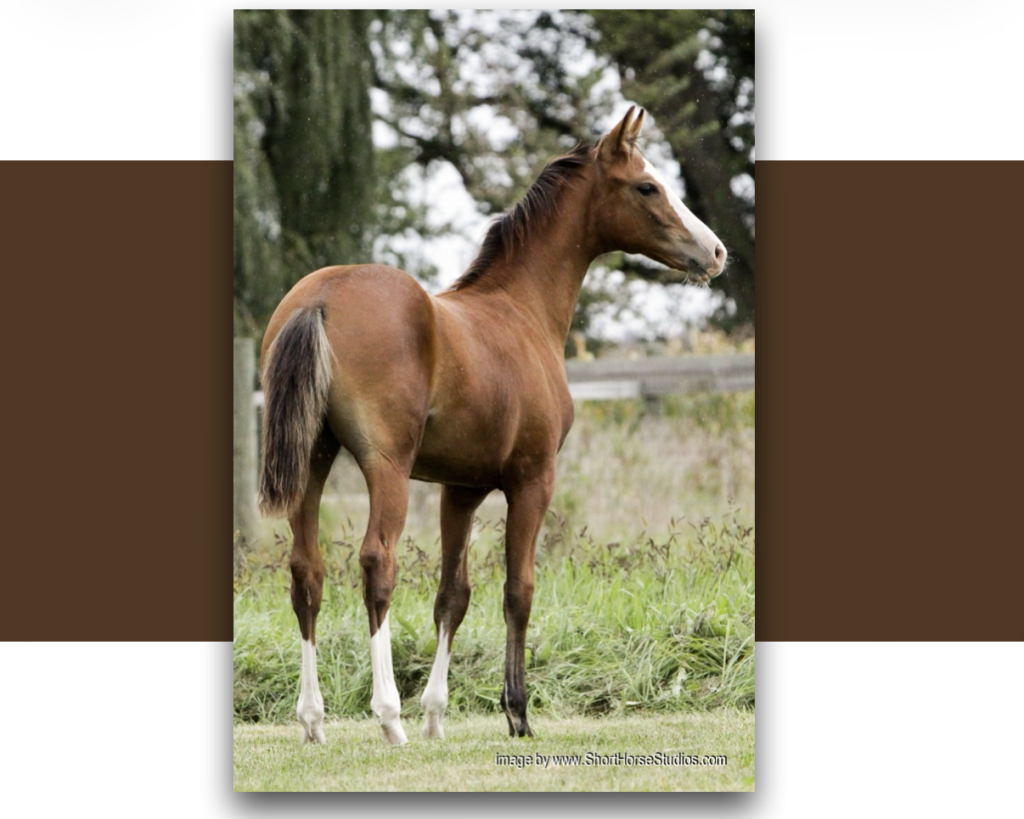
This was taken when this colt was just a little croup-high. By choosing a 3/4 rear angle, we don’t see it quite as much. If I had chosen a higher camera level, I could also have “flattened” the topline a little more. This angle also works well with the high head and neck position and shows a nice shoulder.
How you place the horse within the rectangle of the frame will change the apparent balance of the horse, especially for movement and conformation shots. In general, the bottom of the frame should be level with the horse’s feet, regardless of the angle of the fence or whatever might be behind the horse. This way, you make the horse look balanced on his legs. I also like to leave enough room around the horse in the frame so that the horse has somewhere to “be” in the frame and it doesn’t feel crowded, especially for movement shots.
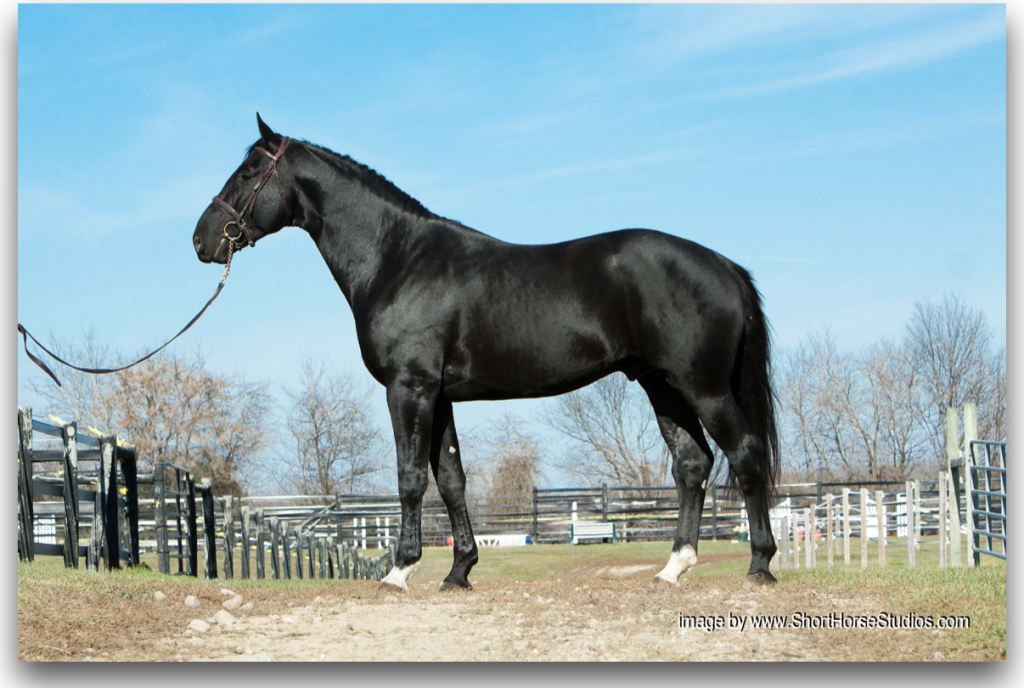
Another low angle, this time for the simple blue sky background as well as to emphasize this stallion’s size and bone. His high, forward neck position works to lengthen his neck and balance his head size while still reaching forward enough to keep the underside of his neck loose and his throatlatch clearly defined. I purposely left space around him to make it easier to see his shape in contrast to the background. This also helps later on if this image would be used in a publication, either as an advertisement or in an article—there is more flexibility in how the image can be cropped to suit the need.
For head shots, or any shot that doesn’t contain the whole horse: put the edges of the frame at some part where there is not a joint, like the middle of the forearms for a vertical shot, or right behind the withers for a horizontal shot (see head shot images earlier noted in the article). You can also crop in the middle of the canon bone, and sometimes in the middle of the neck, all depending on whether your frame is horizontal or vertical.
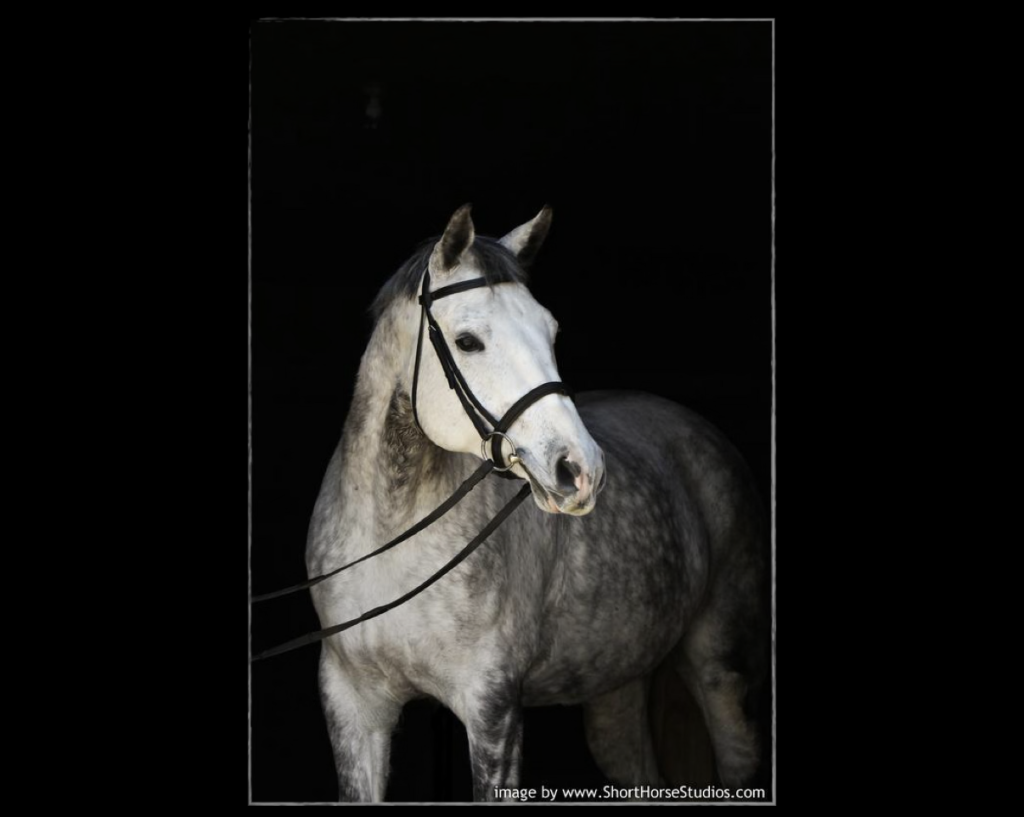
I cropped this image right in the middle of this horse’s forearm. It doesn’t seem intuitive, but it works much better than literally “chopping him off at the knees.” Keep in mind, too, the ultimate purpose for the image; if you’re going to make prints, be sure to leave some room for cropping on the print as some sizes have a different aspect ratio (shape) than a “full frame” image from a camera. If you’d like to make an 8×10 print, you will lose the equivalent of an inch on either end of the frame.
FOURTH: CHOOSE A CAMERA HEIGHT
The last thing we need to pick is the height of our camera: low, medium, or high.
A low angle will make the horse look taller and his legs longer, and a more level, “belly-height” angle will show his body with a more normal perspective in a full-body shot. I tend to be somewhere between a low height and in the middle, usually at about belly height for most conformation and movement shots. This is so the viewer gets a good look at the outline of the horse without distorting it too much. There are, of course, creative reasons to use extremely high or extremely low heights.
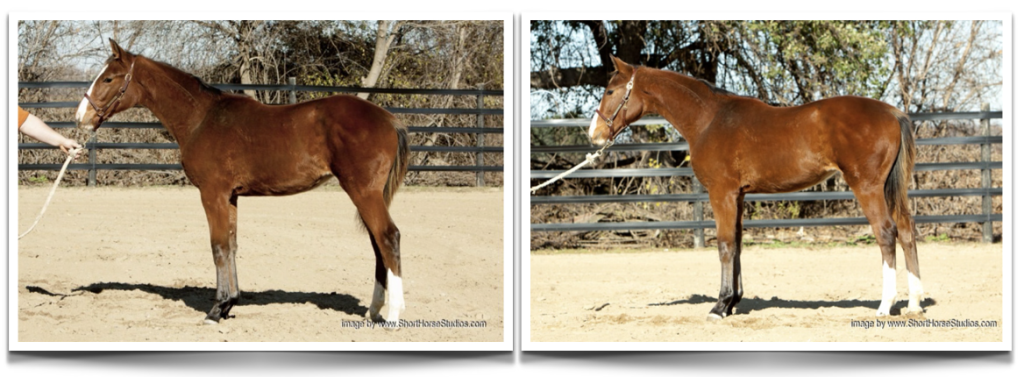
Same horse, different camera heights (and slightly different angles). The difference is subtle, but in the first image, where I’m at eye level, this filly looks chunkier, and in the second one she looks a little sleeker. There are things I would like to fix in both images, for example I would have liked to adjust her stance, but things like that are not always possible with young horses and you always just have to take what they give you.
For head shots, I tend to go with a lower height so I can get a better view of the eye and to give the horse some “presence,” while maybe hiding the withers/back connection with a turned head, which looks good on most horses. If he’s tall and his head and neck are upright, eye level (which for me is about 4’9” or so) can look nice, but it doesn’t usually work so well for a horse that has a shorter, thicker neck.
FIFTH: TAKE A TEST SHOT
So we have found our light and our background, we’ve decided what part of the horse we want to photograph, and we’ve chosen our angle and camera height. The only way to know what we’ve got is to get something—take a test shot.
Assuming you’re working with a digital camera, take a look at your LCD screen and see if things look right. Compare what you see on the screen with the scene in front of you. Always be asking yourself: what is the most important thing I want to show, and how do I need to adjust my test shot to make the shape (light/shadow, framing/cropping, and background) to show it?
What might the horse need to do differently?
SIXTH: MAKE ADJUSTMENTS
You might have to change any one of the things you set up, including the horse. Along with that, you may have to change other things based on what you changed! Most commonly, you may have to adjust your exposure if you’re not shooting in automatic mode (and sometimes especially if you are). Another example would be if you change your angle from the side of the horse to the front, you may have to turn your camera so it’s vertical to fit the whole horse in the frame, and you might also have to turn the horse toward better lighting.
The more you do it, the more automatic the process becomes. And, you may find that doing things in a different order works better for you. I don’t always do things in this order, either.
In the next article, I’ll talk about how to photograph the moving horse.
This article series originally appeared in The eQuester, the newsletter of the WDEA, Wisconsin Dressage and Eventing Association (formerly WDCTA, Wisconsin Dressage and Combined Training Association). Special thanks to all the owners, riders, handlers, and of course the horses for making this possible and allowing me to use your images.
If you have questions, comments, or even complaints, you can reach me at shorthorsestudios.com or find me on Facebook.com/shorthorsestudios.
PLEASE FEEL FREE TO ASK ANY QUESTIONS OR LEAVE COMMENTS FOR DISCUSSION IN THE FORUM BELOW THIS ARTICLE
SOCIAL MEDIA: